Lotus Exige Data Acquisition System
Part I: Overview
This is the first page in a multi-part series describing the Data Acquisition System (DAQ) I built for my 2007 Lotus Exige track car. This page will focus on a high level overview of the project and the outcomes. The full series of pages is linked below:

Purpose
The goal when building this system was simply to have a proper motorsports grade system in my car. Some of the motivation was to have lots of data available to analyze, while the rest was just to enjoy the process of building it. As an engineer, I get a lot of satisfaction in building quality systems as well as analyzing data to understand what is truly happening.
I sought to use the same components and materials that are used on professional race cars, while having a similar sensor suite to what would be found on a GT or prototype level car. In some areas I took this a bit further and added sensors simply to get data that I was curious about.
Components
A MoTeC C187 display logger was used to handle all the data processing and recording. All wiring uses Spec 55 wire with Raychem DR-25 heat shrink. All connectors are Deutsch DTM connectors that use ATUM Glueline for boots.
Sensors:
| Data | Sensor/Source |
|---|---|
| Linear Acceleration (X, Y, Z) Angular Rate (X, Y, Z) Magnetic Heading (x, y, z, w) |
Vectornav VN100 IMU |
| GNSS Position and Speed | ublox ZED-F9P with ublox active antenna |
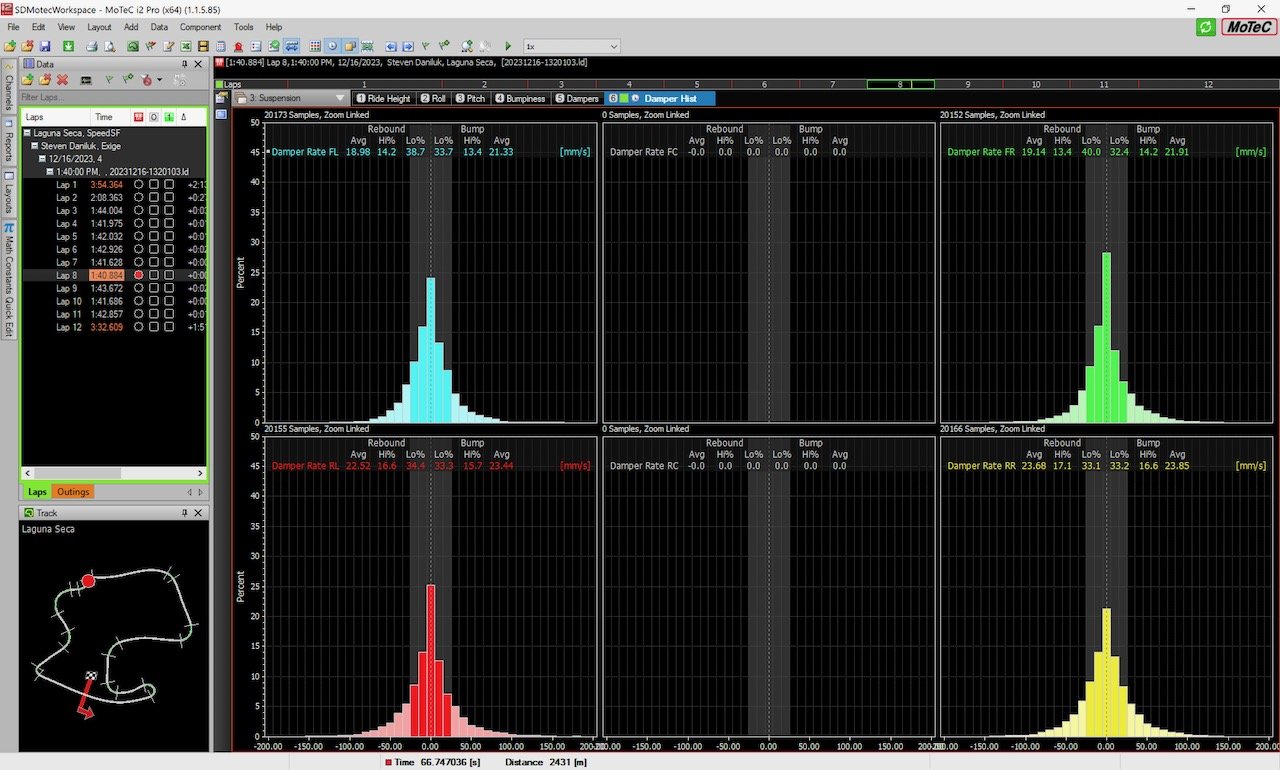
| Damper Position | MoTeC linear potentiometer |
| Steer Angle | RaceGrade 10” String Potentiometer |
| Throttle Pedal Position | Vehicle* |
| Brake Pedal Position | RaceGrade 4.7” String Potentiometer |
| Clutch Position | Contact switch (unknown brand) |
| Tire Pressure Tire Carcass Temperature (16 bands) |
IZZE Tire Pressure and Temperature Monitoring System (TTPMS) |
| Wheel Speeds | Vehicle* |
| Engine RPM | Vehicle* |
| Fuel Level | Vehicle* |
| Water Temp | Vehicle* |
| Oil Temp | Texense PT-100 RTD |
| Oil Pressure | RaceGrade 100 PSIG Pressure Transducer |
| Intake Temp | Vehicle* |
| Air Speed | Texense PI-4 4mm - 50 mB |
* Tapped into existing sensors or signals already present on the car. More details in the Build and Configuration pages.
Notes:
Brake pressure would be preferred, but at the time I did not want to tap into the brake lines to add a sensor there. Brake pedal position is a reasonable proxy as long as there is no brake booster present, which is true in my case.
A string pot was used for the steering position because it was easier to install on the existing steering column than adding a pulley for a belt driven rotary potentiometer.
The pitot tube for measuring air speed is not a necessary sensor, I simply wanted to see data from one and thought it would be fun to add.
Reasoning for Hardware Selection:
MoTeC C187 Display Logger:
Wanted the level of customization for I/O that MoTeC loggers provides
Wanted analysis functionality that i2 provides
Wanted the extra I/O capacity that the MoTeC 18X series provided over the 12X series
Wiring: Spec 55 wire and DR-25 heatshrink are industry standards for dealing with the temperatures, fluids, and fatigue in motorsports applications
Connectors: DTM connectors with boots made of Glueline were used everywhere due to cost and maintenance reasons. They are easier to construct and far less expensive than using Autosport connectors with Raychem boots.
Sensors:
IMU: Configurable, robust, runs at a very high internal rate (measurements at 800 Hz, onboard filter estimates at 400 Hz, outputs at 100 Hz), and had prior experience with that model
GNSS: Configurable, 20 Hz update rate, compatible with multiple constellations (GPS, GALILEO, GLONASS, and BEIDOU, all simultaneously), SBAS compatible, and had prior experience with that model
Potentiometers, oil temp and pressure sensors were all selected from items offered by Texense or RaceGrade, since these are all on the outside of the car and subject to more extreme temperatures, vibrations, and fluids/debris
The Final Product


A 3D printed mount was made to support the C187 dash from the cavity on the dash that previously held a stereo. This was designed to make the whole thing easily removable. The mount connects by 4 bolts to a custom backing plate installed on the dash, and once removed the stereo hole can be filled with a custom Lotus backing plate I made. The harness can then be tucked under the dash and strapped in place.
The wiring harness is split into a few main sections:
Trunk: Runs from the C187 display to underneath the right side of the dash
Front: Connects to from the trunk harness and runs through the front firewall to reach the FL and FR wheel wells
Rear: Connects to the trunk harness and runs through the cockpit then through the rear firewall to reach the RL and RR wheel wells as well as the engine bay
Driver inputs: Connects to the trunk harness and runs underneath the left side of the dash to connect to all driver sensors
On the dash mount there is a power button and three auxiliary buttons which can be used in combination with each other to control the following:
Start/Stop recording
Cancel auto recording
Mark an event in the log
Reset session timer
Reset best lap
Reset any active alarms
Switch pages
The dash lights are configured so that the top row shows shift lights. The side lights are used for lock ups or wheel spins and will progressively illuminate and eventually flash for aggressive lock ups or wheel spinning.
Notable Configuration Features:
Auto Logging: The dash will automatically begin logging after the vehicle starts moving (unless this is preemptively disabled via a button press)
Sector Times: Laps are divided into three sectors, and the best sector time from each session is tracked and used to estimate a theoretical optimal lap time
MoTeC Display creator was used to generate custom display configurations. It was inspired from a few existing dashes (notably the Porsche 911 GT3 RSR), as well as the racing simulators ACC and iRacing. The first page is the primary page used while on track, the second page shows some additional sensor data.


Notable display configuration attributes:
Visual and numeric lap time delta
Potential optimal lap time from best sectors
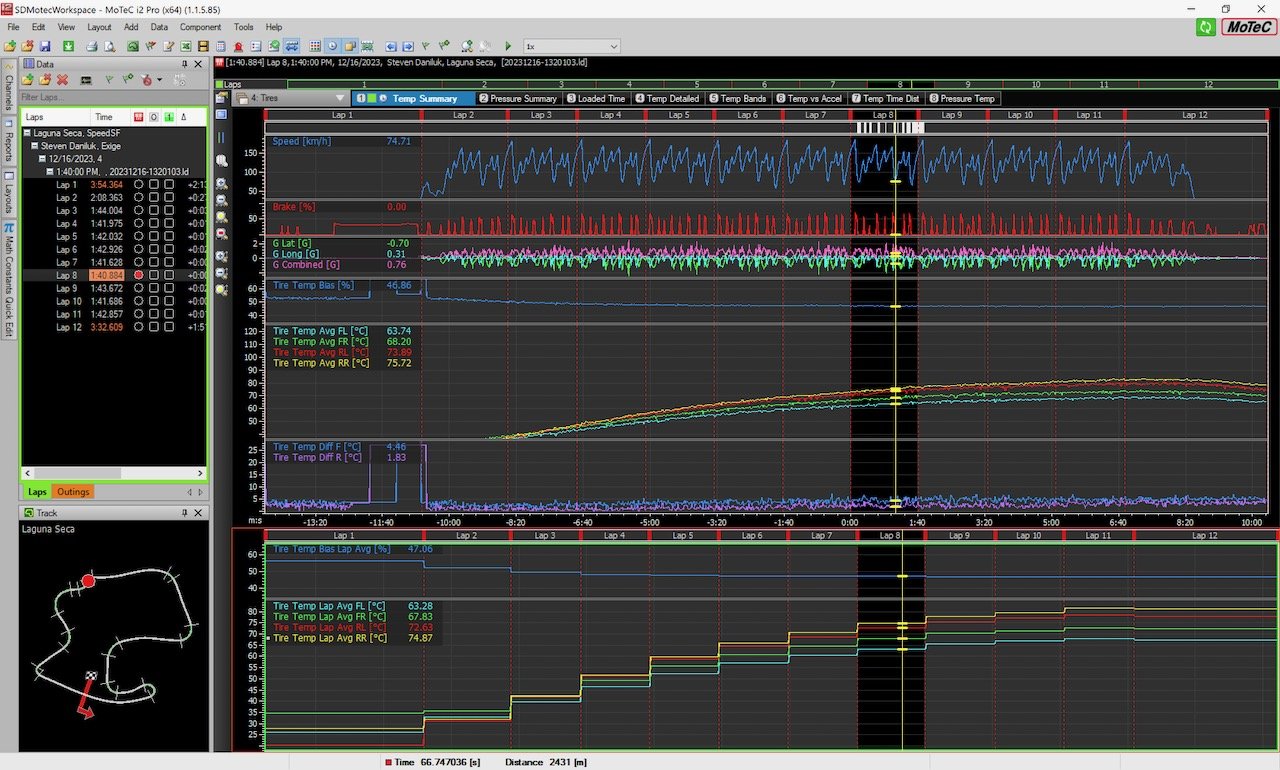
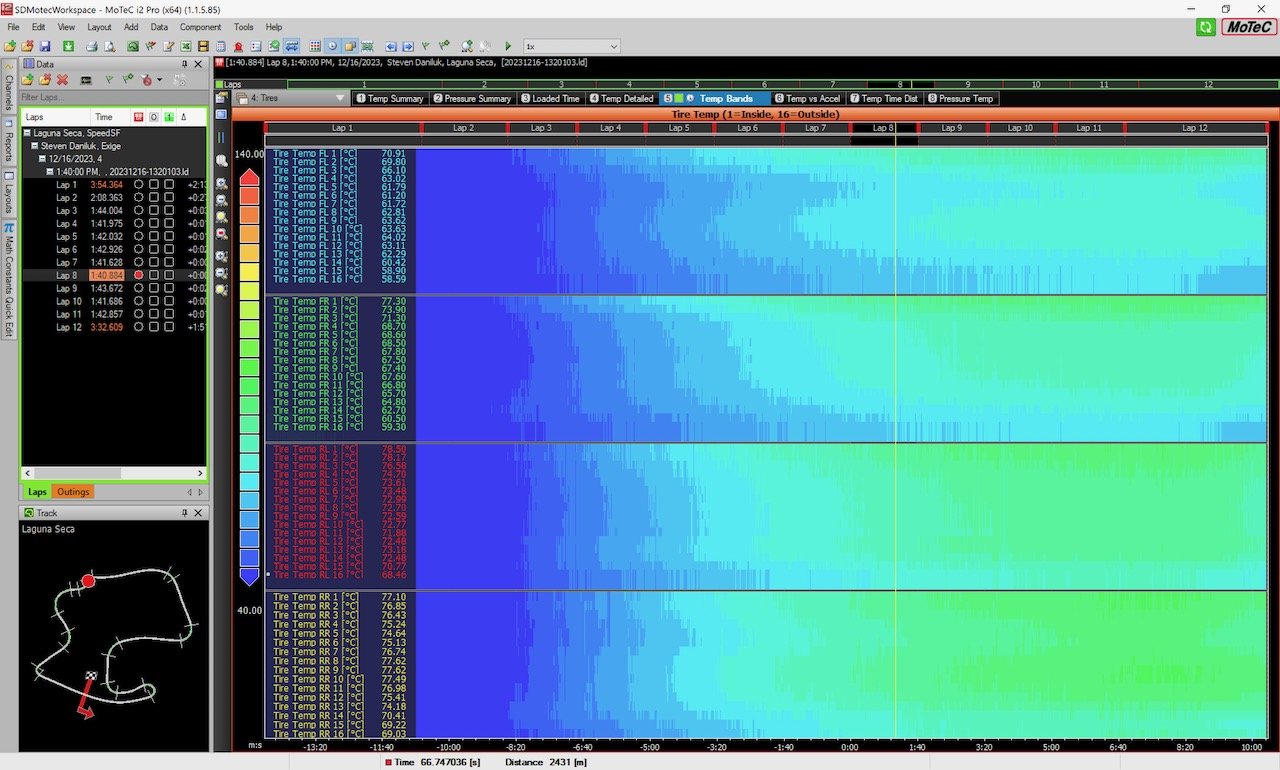
Current tire pressure and average temperature
Tire bands change colour based on temperature of inside, middle, and outer sections of the tire (Blue → Green → Red)
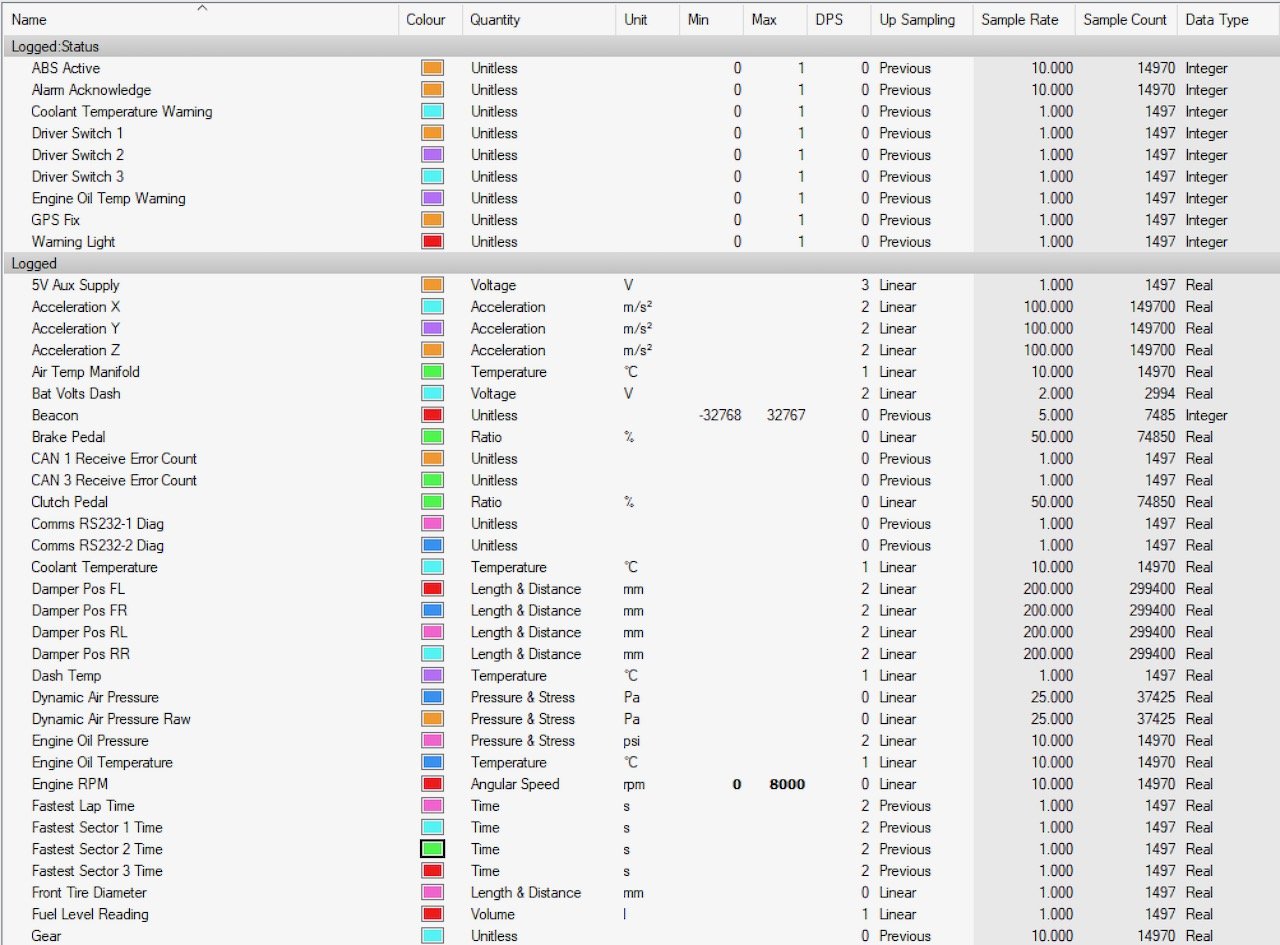
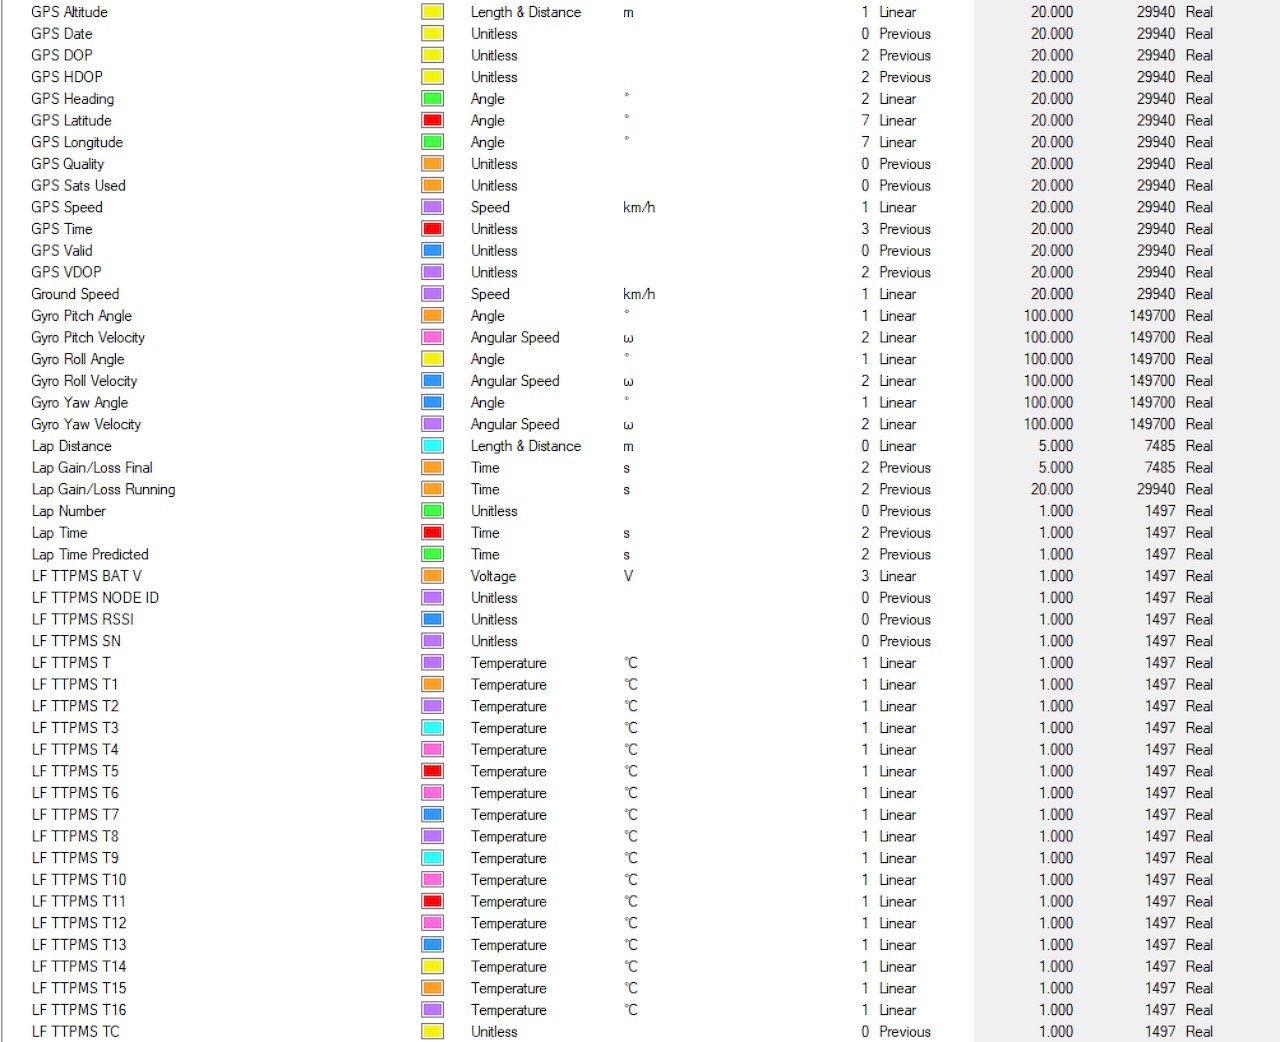
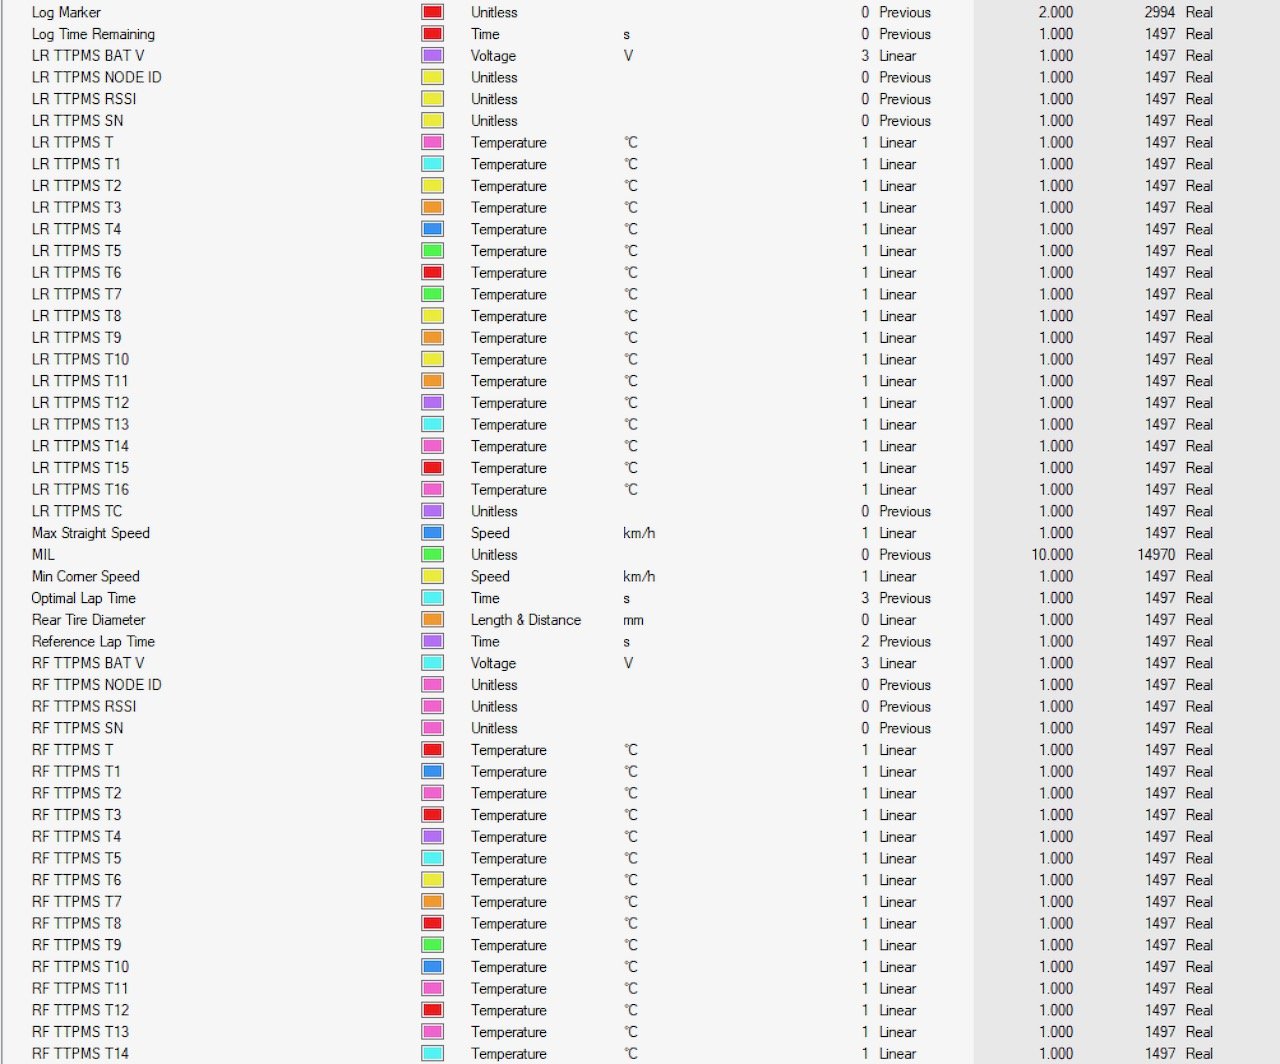
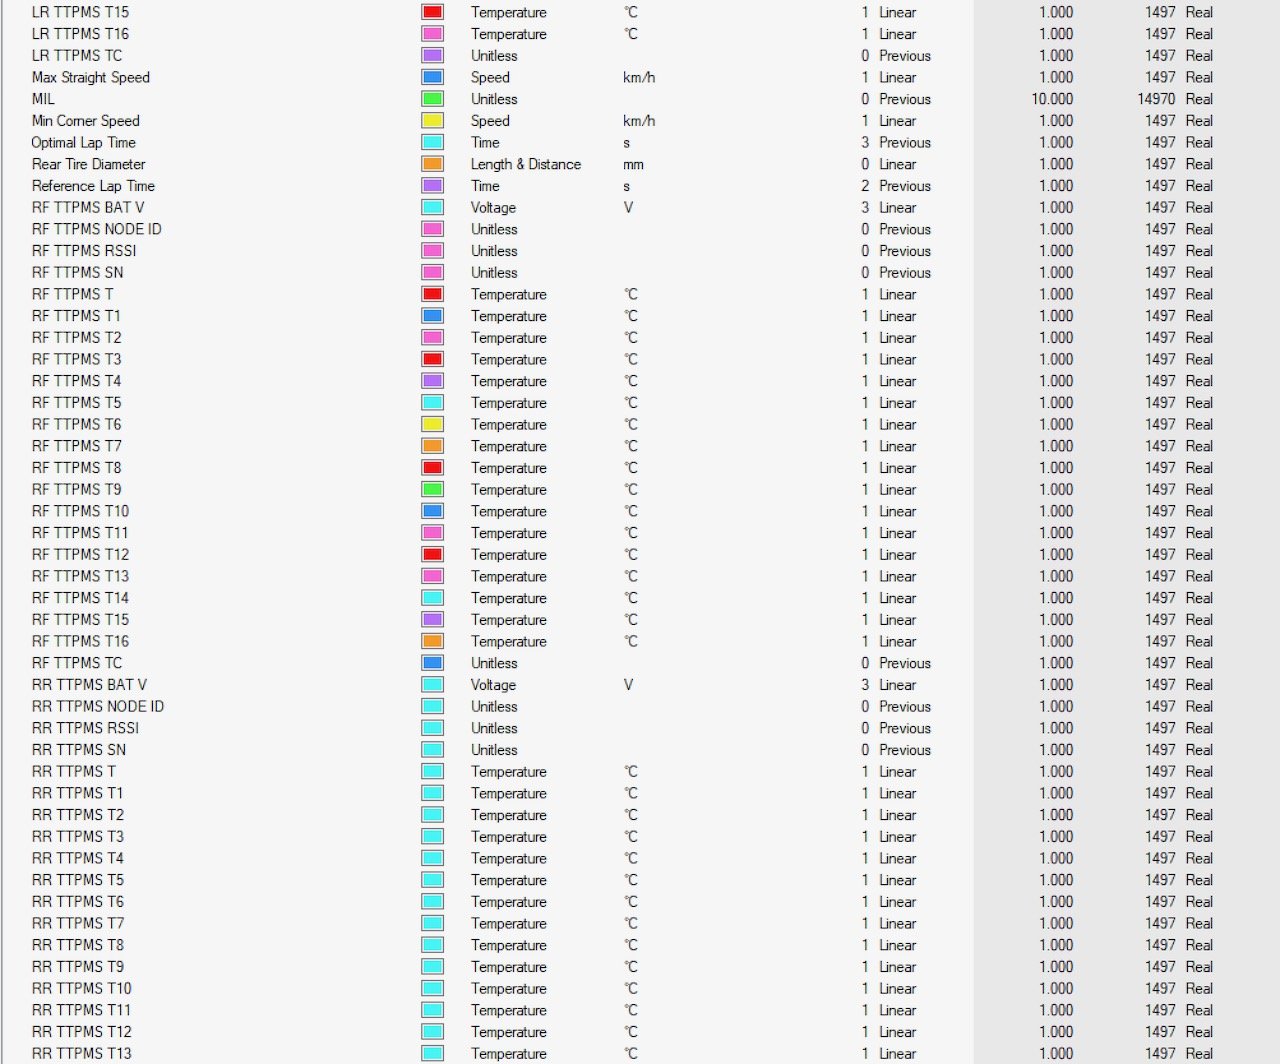
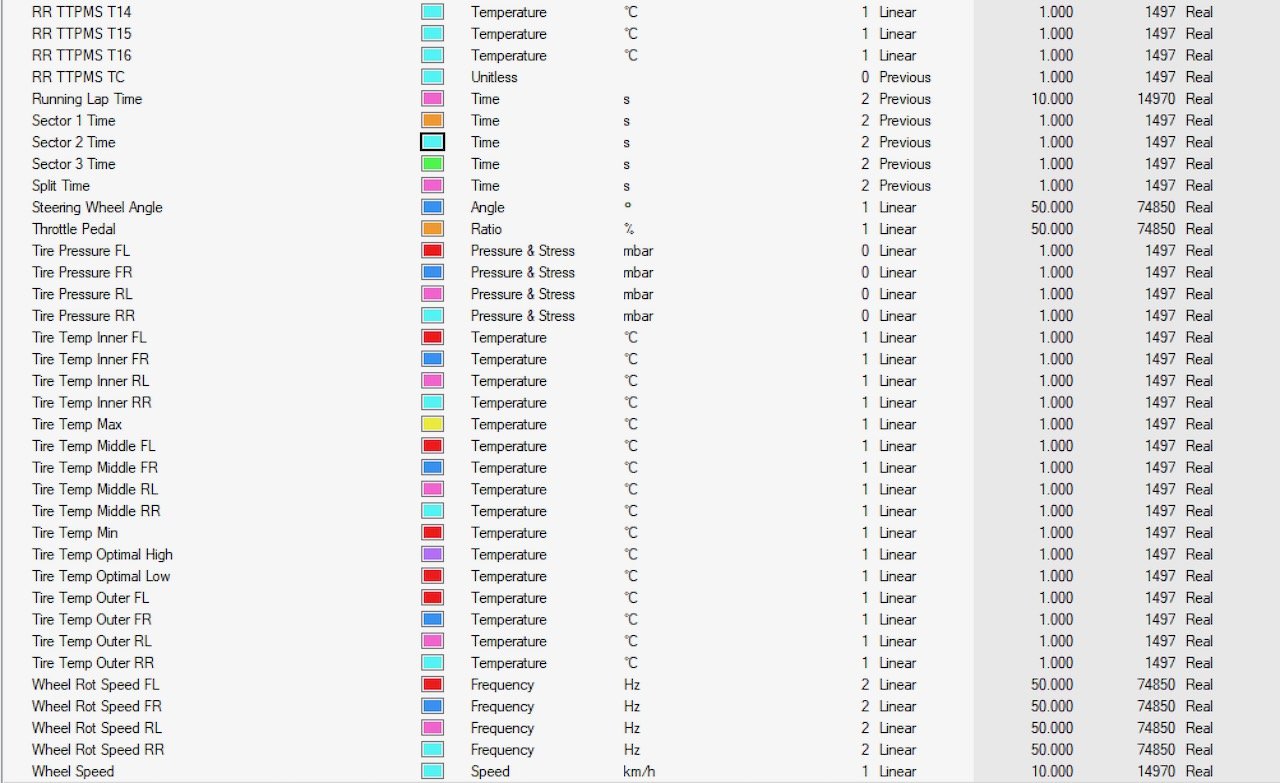
Below are some screenshots from MoTeC i2 showing all of the channels recorded in a typical log file:
Usage and Benefits
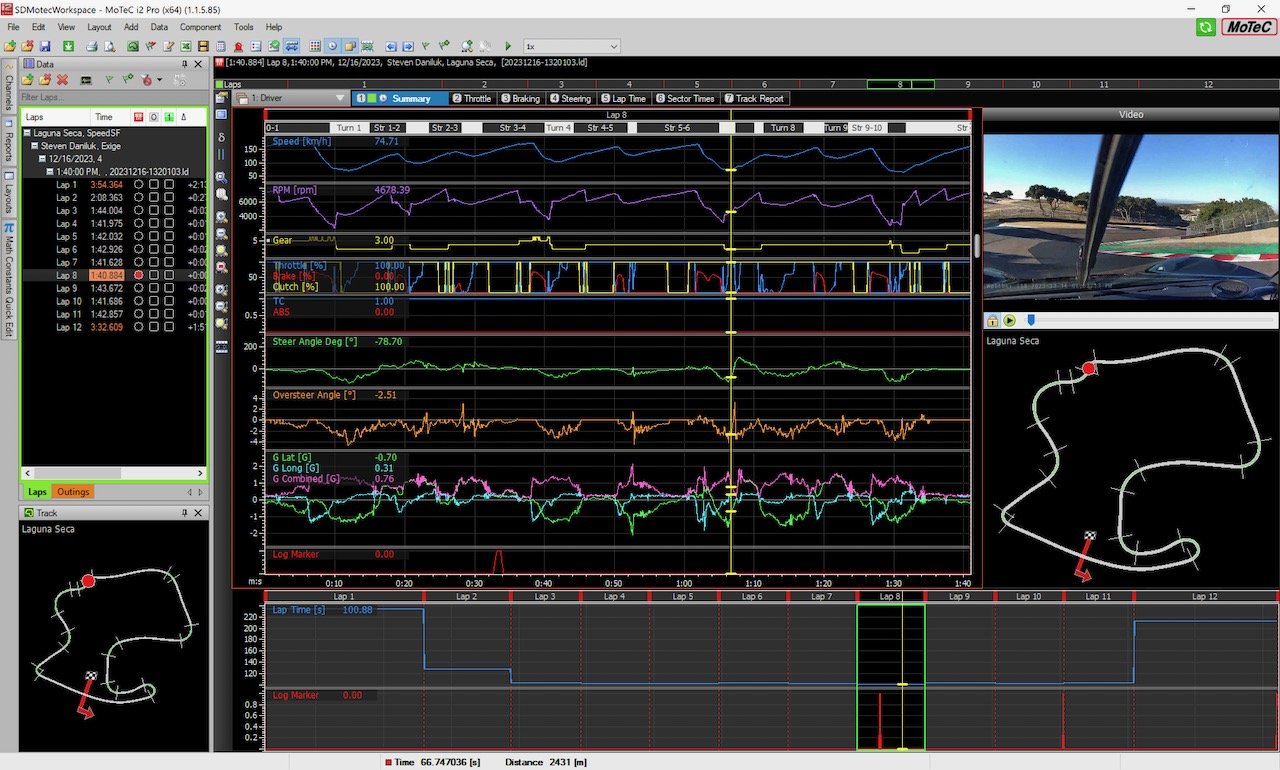
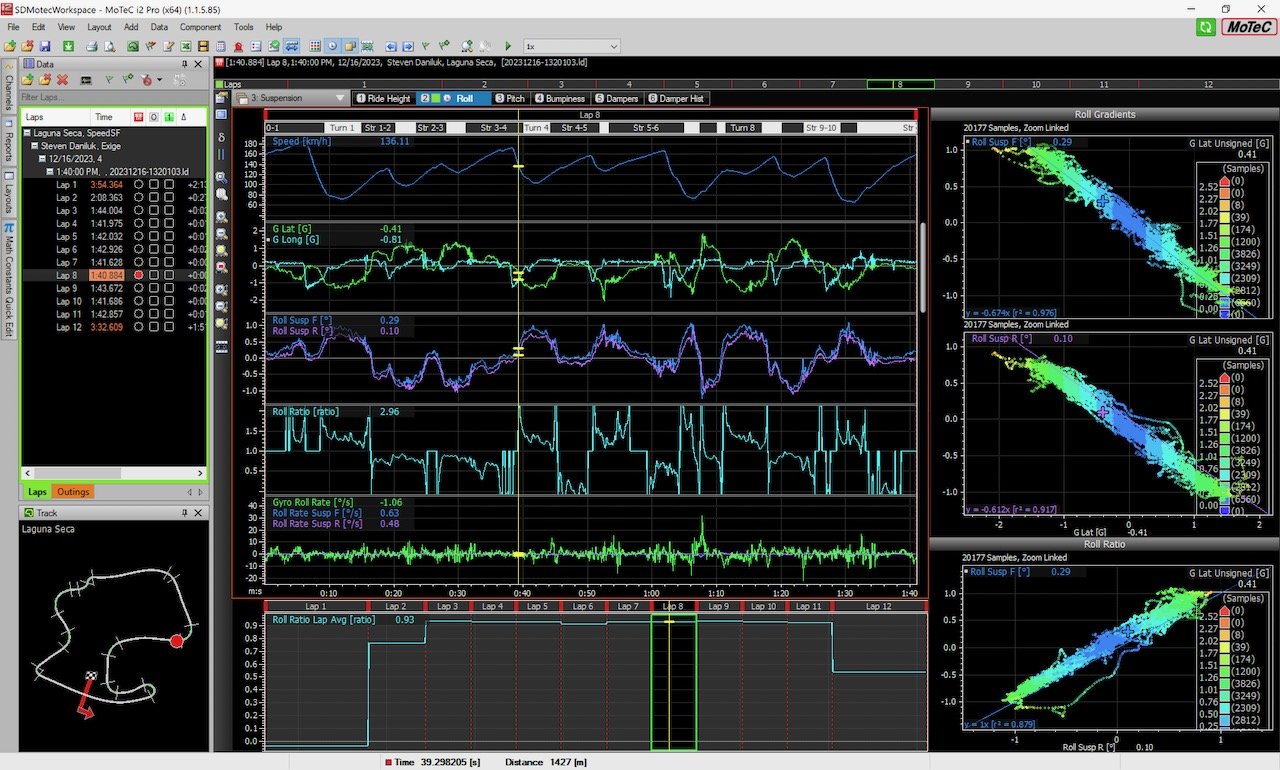
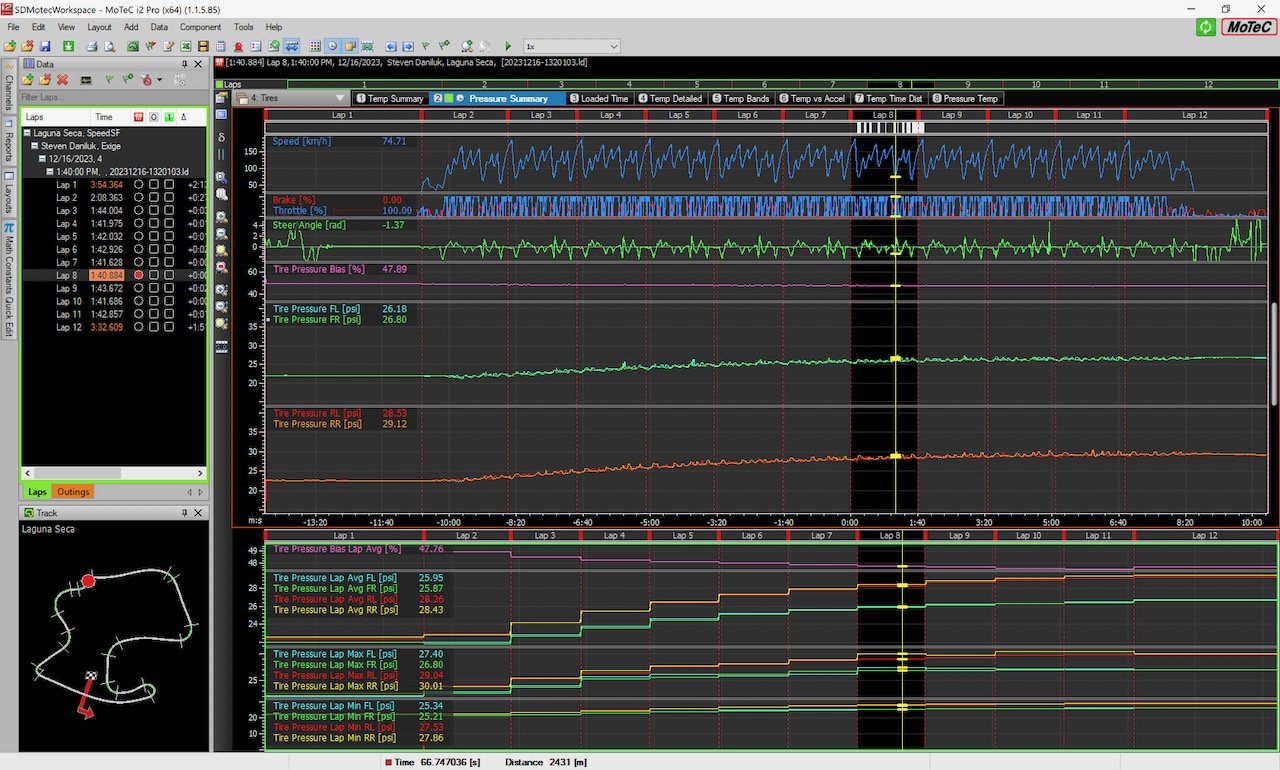
You can get some very interesting plots and graphics within i2 from all of the data recorded.
For analyzing all logs I use a configurable i2 workspace I created which can be found on GitHub here: SDMotecWorkspace. It’s a single workspace configured to easily support multiple log sources without any changes. It’s what I use to analyze logs from my Exige, as well as ACC and iRacing.

What can you get from all this data?
Overall, one of the biggest motivators for having a DAQ is that you can make decisions based on data and physics, as opposed to lap times and driver feel. There are an enormous number of variables present with every run due to changes in ambient temperature, track temperature, air density, wind, tire condition, driver input, warm up procedure, traffic, etc. The situation is even worse for amateur drivers (like myself) that can’t put in perfect laps back to back, and will run the same tires for several months which are constantly changing with every additional heat cycle. There are too many uncontrolled variables to rely on lap times alone. But, if you have data available as well as an understanding of the underlying physics you can optimize things individually, and more importantly you can use that data to know when comparisons are valid.
You can also configure alarms in the dash to offload the responsibility of detecting some anomalies to the hardware so you can focus on driving. I have alarms configured for oil temperature, oil pressure, water temperature, and rapid reductions in tire pressure.
If I had to list what data provides the biggest impact I would say:
High quality GNSS receiver
Tire temp and pressure monitoring system
Having a high quality GNSS receiver (update rate of >10 Hz, low positional and speed error) paired with something that can compute lap time deltas and display frequent updates is enormously helpful for driver development and learning a track. It enables you to observe the effects of minor adjustments in your lines or pedal inputs in near real time. You can watch your delta climb and drop by tenths or hundredths of a second as you make small adjustments.
The TTPMS enables you to hone in on exactly when the tires are at their best, which is often one of the biggest variables in performance. When analyzing a full session you can see how long it takes for the tires to reach steady state, and what those steady state pressure and temperatures are. While driving you can observe the real time pressure and carcass temperature which enables you to correlate that to the feel of the tires. As they come up to temp/pressure you can note at what pressure/temp range they start to come in, when they feel their best, and when they start fall off if they get too hot or over pressured due to the initial settings or your driving.
Continue on to the next page in this series - Part II: Build